
Getting started

Welcome to myteam
We are delighted to have you here. In this introduction we explain the first steps to help you find your way around the myteam App. The myteam App is designed to help you organize everyday life with your team and keep track of everything.
Using the app
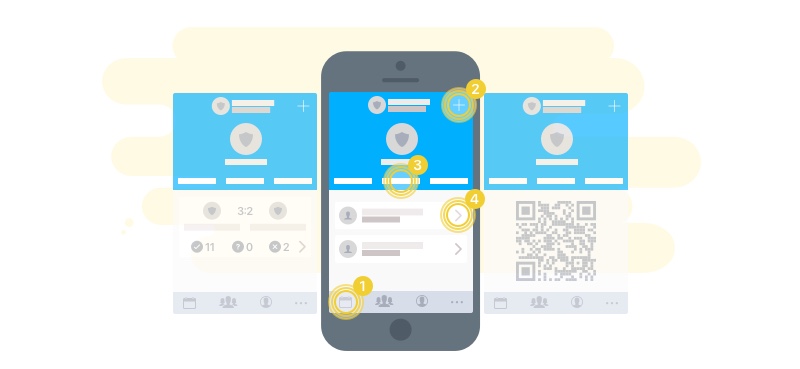
Using the app itself mostly follows familiar patterns that you should recognize from most apps on your smartphone. We use a navigation bar at the top of the screen with a back button on the left and new, edit or save buttons (2) on the right. At the bottom of the screen you will find a tab bar (1) to switch between the different sections such as Events, Team, User and more. The middle area contains the content of the individual sections and consists of lists or detail views, which in turn can contain several tabs (3). To switch from a list to a detail view, tap the entry or the arrow (4).
Signing in
After you have downloaded and installed the myteam App from the Apple App Store or the Google Play Store, the app's sign-in screen appears. You have three ways to enter myteam:
-
Create a new team Use this option if you are new to myteam and want to create a new team. Your login credentials are created in the process, and you are automatically added to your team as a coach. After the team has been created, you need to log in with your newly created credentials.
-
Register with a code If you want to join a team that already exists, the coach will provide you with a registration code. This code is either valid for you individually and can only be used once, or it is valid for 14 days and lets you register yourself as a new team member.
-
Sign in Already registered with myteam? Then simply sign in using this option. Your login normally remains valid for 30 days. You only need to sign in again once your session has expired and you have not used myteam within the last 30 days.
For these first steps, we follow option 1 and create a new team together with your login credentials. Choose a team name and select a sport. At the moment the sports have no further meaning. In the future, however, we will introduce sport-specific customizations. Then, for example, terminology, workflows and views will be adapted.
Now enter your name, email address and password, and you are ready to go. We then create your team in the background and you are automatically added as a coach (you do not have to remain a coach – you can read exactly how the different roles work in the Teams section).
We do not pass email addresses on to third parties. They are used exclusively to contact you regarding the myteam App – when you reset your password, when important maintenance work on the system needs to be done that could affect you as a coach, or for matters that require your urgent attention. We will never contact you for advertising purposes. Email addresses are also shown to the respective coach (or team administrator) so that the coach can contact you about team matters.
Once the team has been created, you are redirected to the sign-in screen and can log in with the credentials you just chose.
An internet connection is always required to use myteam, since you maintain and access data together with your team. All data is stored on our servers (in Germany) and is available only to you and your team.
Every new user also receives a verification email at the start. Please click the verification link in the email so that we can confirm your account. Unconfirmed user accounts are locked after 7 days and eventually deleted. If an email does not arrive, please get in touch with us briefly.
Tour through myteam
After your very first sign-in, you are shown a short tour through myteam. Depending on whether you created a new team or registered with a code, the tour will differ. You can find all tours at any time under the More tab and watch them again.
Create your first team member
After your tour, first switch to the Team tab. Here you will find yourself as the first member in the list. To create more members, simply tap the (+) icon at the top right. The only information you need is the name and the role of the new member.
Roles define the permissions a member has and the groups you want to organize them into. Initially there are three roles: coach, supervisor and player. In the Teams administration you can change the names and permissions of the individual roles, and add or delete roles.
Every member must have at least one role. However, you can also assign several roles at the same time.
Have you entered everything? Then tap the checkmark at the top right to save the entry.
If you want to give the new member access to myteam, select the Link tab in the detail view. There you can generate an individual invitation code and share it with the member (SMS, email, WhatsApp, …) so that the new member can register (see above, Signing in – Register with a code) and take over the member profile.
Invite more members
To add more members, you can repeat the previous section for each member. If you do not want to enter all the information yourself, you can also generate a shared registration code for all members. A registration code always applies to one role and is valid for 3 months.
At the end of the team list you will find the button invite new members. Then choose which group you want to generate a code for. myteam automatically jumps to the corresponding role in the Teams administration. There you can generate the code and share it right away. Anyone who receives this code can use it to register with myteam, automatically creating the corresponding team member. In the role's detail view you can also renew the code once it has expired.
Anyone assigned a role with the Can edit team permission can add, edit, delete and invite team members. These team administrators can also view personal data. Other members only see the general data. Every member can also edit themselves at any time.
Join a team
If you have received an invitation code, you can use it to register with myteam. Download the myteam App. On the start screen, follow the second option Register with a code. Enter the code on the next page. Depending on where you received the code, it can sometimes be difficult to copy just the code. In that case, simply copy the entire invitation text and paste it in – we will try to extract the invitation code for you.
Depending on which code you received, your member data may already be prefilled and your team and member name are displayed. Then you only need to enter your user credentials and you are ready to go.
If your member name is not prefilled, you have been invited to join the team. In that case, your user is automatically added to the team as a new member. Enter the name together with your user credentials and off you go.
Accepting and declining
As soon as you have joined a team as a member, the start screen (the Events tab) shows all events you have been invited to. You can now simply accept or decline the events. If the status is shown in color, you can see whether accepts or declines have already been submitted.
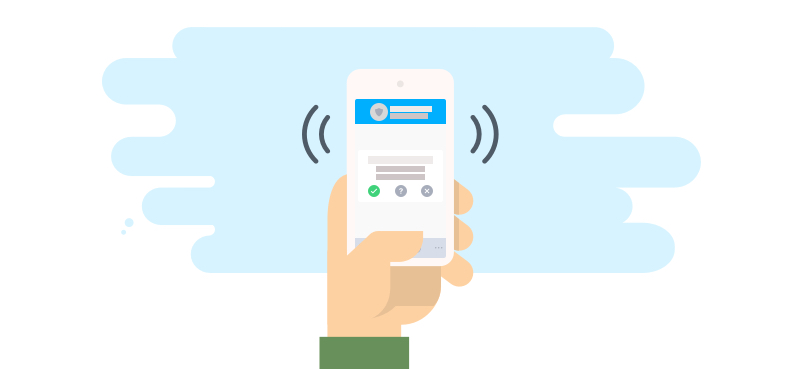
To accept or decline, simply tap one of the three symbols (√ = accept, ? = unsure, – = decline) below the respective event. If a symbol is highlighted in color, that is your current status. The coach can preset it. When accepting/declining, you can leave a comment. If you press and hold the symbol, the status is set without a comment.
As soon as a coach adds or changes events, you are informed via push notification. When you accept or decline, your coach also receives a push notification.
Coaches or members with extended permissions can view the list of participants for each event in the Participants tab. They can also decide, when creating an event, which groups of people should be invited and whether a status (accept or decline) is preset.
Experience has shown that mandatory declining (i.e. members are always considered to have accepted) achieves higher training attendance than mandatory accepting.
Creating events
Creating events works the same way as creating members. In the Events tab, simply tap the + icon at the top right. Then you can choose the type of event:
-
Training: Recurring events
-
Match: One-time event where an opponent can be specified
-
Tournament: One-time event
-
Event: One-time event for everything else
Time details can be set for each event. You can also set a deadline up to which point before an event the accept/decline function is still available. Likewise, you can specify which groups of people should be invited to an event. Members with extended permissions for events (defined in the team's roles) always see all events. All other members only see the events they have been invited to. You can also preset an accept/decline status as a default.
You can also add location information to each event. If we can find the place or address, a map is displayed and your members can start their route planner from there. Likewise, the expected weather information is shown to you before the event.
You can delete or cancel events. Deleted events are completely removed from the system. Canceled events continue to be displayed as canceled, and you can reactivate them at any time.