
Events
Event management is one of the core features of the myteam app. You can create events and invite your team members to them, get information about accepts and declines, log attendance, add directions and much more.
There are currently four different event types you can use. Each type is displayed a little differently and can offer additional information:
-
Training Trainings are recurring events; as a special feature, you can set the cycle in which the event repeats. If you want to move, delete or cancel a single training, it can be detached from the series so you don't have to change your entire training schedule.
-
Game A game is a one-time event where you can specify an opponent. You can also define it as a home or away game and add a final report.
-
Tournament Tournaments are also one-time events with a final report.
-
Event Events are one-time appointments you can use for anything else, e.g. a parents' evening, end-of-season party, outing, …
What all events have in common is that you can invite your members to them. They are notified via push notification. You can also add a location to any event. If the entry contains a findable address, a corresponding map is displayed, and you and your members can start navigation from there.
For every event with location information, a weather forecast is also shown before the event starts.
Creating events
To create a new event, first go to the Events tab. Then simply tap the (+) icon at the top left. Now choose the right type for your event.
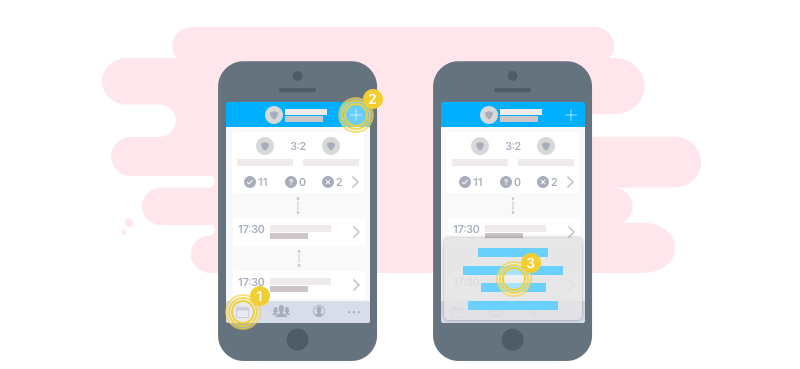
Just fill in the following form step by step. Many fields are optional. Required fields are marked with a red *.
-
Title (Opposing team for games): a short, meaningful title
-
Description: Here you can enter a longer description of the event.
-
Home/away game (games only)
-
Date and time Recurring events (trainings) Start date: Defines the date of the first event.
-
End date: Defines the date of the last event in the series.
-
Start: The time at which a single event takes place.
-
End: The time at which a single event ends.
-
Meeting time: A time before the start at which your team should meet for the event.
-
Repetition: The frequency at which an event should repeat, defined as a number and a time unit (days, weeks, months, …).
-
One-time events (game, tournament, event) Start: Date and time defining the start of the event (e.g. kick-off time).
-
End: Date and time defining the end of the event.
-
Meeting time: A time before the start at which your team should meet for the event.
-
Invitations + registration deadline If you want to invite team members to the event right away, select who should participate in the event. You can select roles to invite everyone belonging to those roles, or simply select the individual members you want to invite. For each selection, you can decide whether they automatically count as accepted – meaning players have to explicitly decline if they can't make it – or whether they have to explicitly accept an event. You can also make this selection later and change the invitations afterwards. In addition, you can define a registration deadline in hours before the start/meeting time. Accepting/declining is only possible up until this registration deadline. Also decide whether a comment is required when declining. If the switch is on, declining is only possible when a reason is given.
-
Participant limit If you define a participant limit, only a limited number of invited members can accept the event. Once the limit is reached, no further member can register. It's important to note, however, that as a coach you always have the option to go beyond this limit in the participant list. The limit does not apply in this case. It can also be exceeded if you have enabled automatic acceptance for the invitations. If more members are invited than would be allowed and all of them count as automatically accepted, they all remain accepted.
-
Location: Specify where to meet, e.g. you can enter a specific spot at your club grounds, such as grass pitch, artificial turf, locker room, …
-
Address: Enter the address here. We resolve the address details in the background using the Google Maps service, meaning anything Google Maps recognizes as an address should work here too; sometimes it's enough to just enter the club name. For combinations that have been used before, we also try to pre-fill matching entries.
-
Push notification: Finally, decide whether we should notify the invited members directly via push notification.
Members only see events if you have invited them or if they are in a role with extensive event management permissions. If you offer individual trainings, for example, you can create an additional role for those members or invite them individually. That way, the events are only accessible to them.
Invitations
Currently, you can invite team members while creating or editing an event. There you can invite by roles, but also invite individual members. myteam comes with preconfigured roles (coach, assistant, player) into which you can divide your team members (you are free to rename the roles and/or add or delete more). You can choose whether invited members have to accept themselves or whether they count as accepted and have to decline themselves.
If you edit an event series (training) and, for example, add more roles, the change only ever applies to future events; past events are not changed.
Accepting and declining
Anyone invited to an event can set their status to accepted or declined. The status change can easily be made right from the event list. If a registration deadline is defined for an event, the status can only be changed until the registration deadline. After that, a notice is shown that the invited member has to contact the coach personally.
To accept or decline, simply tap one of the three icons (√ = accept, ? = unsure, – = decline) below the respective event. If an icon is highlighted in color, that is your current status. The coach can preset this. When accepting/declining, you can leave a comment. If you press and hold the icon, the status is set without a comment. If a reason is required when declining, press and hold is automatically disabled for declining.
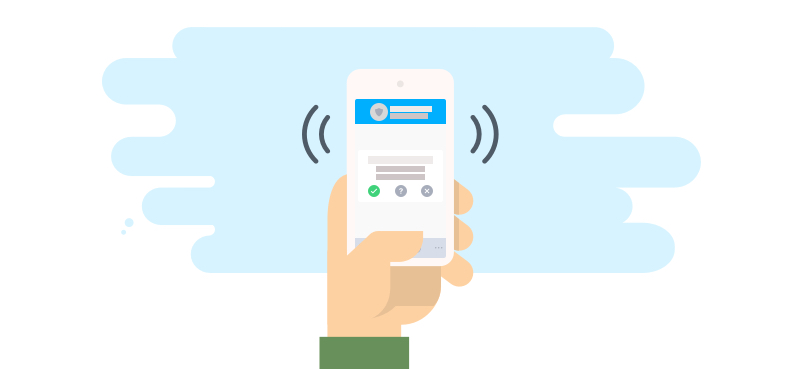
Each role defines whether a member has permission to see the registration status of other members. In the default configuration, this permission is disabled for players. This means a player only ever sees their own status. Experience has shown that other players are quickly inclined to decline as well when others have declined. This can happen frequently, especially among young players. We therefore recommend not making this status accessible.
The coach is informed about a status change via push notification. If a member declines, they also have to give a reason.
Deleting or canceling events
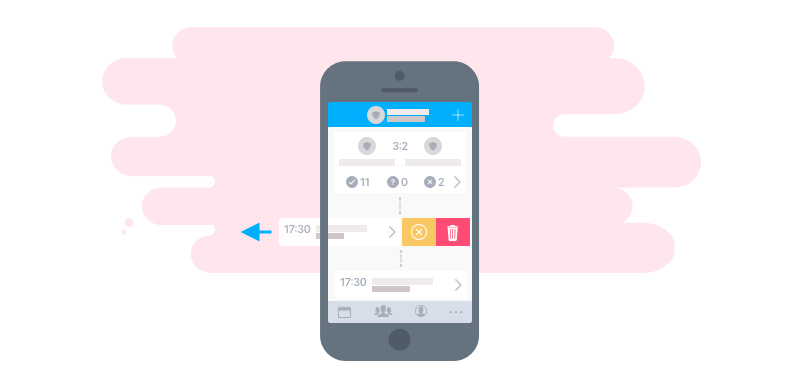
If you are in a role (e.g. coach) that allows you to manage the calendar, you can cancel or delete events. Deleting is NO longer done via swipe gestures; you will find the actions in the detail view of the event. You have two options for removing events:
-
Cancel The event stays in the list, but all accepts/declines are deactivated and hidden, and the event is marked as canceled. With another swipe gesture, you can also reactivate it. It will then appear as usual again.
-
Remove Events that are removed are completely and irrevocably deleted from myteam.
If you cancel or delete an event from an event series (e.g. training), you are first asked whether it applies to all entries or only the current one. If you cancel or change a single event, it is removed from the event series and becomes a standalone entry. Changes to the event series are no longer applied to it.
When canceling or deleting an event, you always have the option to inform the already invited members about the change via push notification.
You can find an overview of the accepts/declines at any time in the detail view of an event under the Participants tab.
Participants, attendance and nomination
As soon as an event starts, the participant list in the detail view of an event automatically switches to attendance mode. That is, go to the detail view of an event and select the Participants tab (1) there. Normally, you will see the list of invited participants and their accept/decline status here. Once the event is running or has taken place, the view automatically switches to attendance mode. Now you can record who actually showed up to the event. At the end of the list you will find various actions for all participants (applies only to accepted participants) such as "everyone here" and "no one here". The accept/decline status is still shown next to the player's picture in this view.
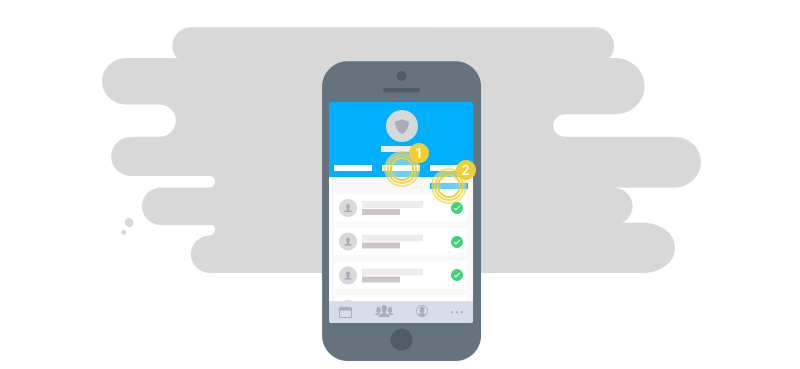
You can switch between accept/decline mode, nomination and attendance mode at any time (2).
The nomination feature allows you to determine who among the accepted participants should be nominated. You can change the nomination for the participants. Nominations only become visible once you release them using the switch at the end of the list. At that moment, the participants are informed via push notification. Every further change to the nomination is sent immediately. The nomination status is displayed in the event lists. As soon as you withdraw the release, the indicators disappear and push notifications are no longer sent.
Exporting the participant list
At the end of the participant list, as a coach, you will find an option to export the participant list. An Excel file is generated and sent to your email address. From there, depending on your device, you can save the Excel file, forward it by email, open it in a spreadsheet application, … . Depending on whether you have permission to see the personal participant data or not, phone numbers and email addresses are also included.
Especially now during the coronavirus period, this feature is meant to help you properly record the participant data for an event.
Tasks
You can define tasks for every event. For this, you will find a Tasks entry in the detail view. If not all tasks have been taken on yet, the entry shows you how many tasks are still unassigned. Simply enter a text for a task and how often it needs to be done. Your team members can then simply take on the tasks, or you can delegate them. You can also delete tasks or add more at any time.
If you manage tasks in an event series, the task always applies to the single event only. Currently, tasks cannot be created for all events in a series.
Carpools
In the detail view of an event there is a Carpools entry. Team members can switch between two views here. There are requests and offers. If a member has free seats, they can offer them. Members looking for extra seats can add themselves to the requests. Anyone who has entered an offer can independently fill their free seats from the list of those searching.
If a member is also looking for seats for additional companions, these are always treated as a block, i.e. if a member is looking for one additional person, both seats are automatically taken when selected. Splitting across multiple offers is currently not possible. If the number of people is greater than the number of free seats, that entry cannot be selected.
All team members are kept up to date about the carpools via push notification.
Game reports
In the detail view of games and tournaments you will also find a Report entry. Here you can note the final score and write a short report. When completing the report, you can inform the members about the news via push notification.
Please note that the Report tab only appears once the event has started. You cannot enter any data here beforehand.
Highlights
In addition to the game report, you can record the highlights of a game. Highlights currently only exist for games and are still soccer-specific. We are working hard to collect the corresponding highlights for the different sports. If highlights are missing for your sport, we would be very happy if you dropped us a quick note at support[ng]myteam-app.de so we can add the highlights.
The individual highlights are already tracked in your players' statistics. In the future, you will also be able to view these.
So your members can find the highlights quickly, they are shown in the detail view as soon as any are available.
Calendar view
myteam distinguishes between two different event views. By default, a continuous list is displayed. It shows the next 20 events in chronological order. When you reach the end, another 20 events are automatically loaded each time. The list view only shows you current events.
If you want to view older events or use a calendar, you can switch to the calendar view at the top left. Here you have a short weekday list and, depending on the selected day, only see the events of that particular day. You can expand the calendar further to get a better overview or jump directly to an event.
Via the calendar, you can also view older events. In the calendar, all events are indicated by colored dots on the respective days. The colors are: green = Training, red = Game, purple = Tournament and blue = Event.
Subscribing to the calendar
If you also want to use your events in a common calendar application or share them with someone else, you can have a calendar link generated. If you scroll up a bit in the event list, you will find a button to subscribe to the respective calendar. Tap the button to have a link generated in the next step. If you have already generated a link, you can now open and copy it or share it with someone.
If you no longer need the link or no longer want to share it, tap the button again and delete the link. That way, you can make sure no one else can view your events.
You can subscribe to the generated link with common calendar applications such as Apple's iCal, Google Calendar or Microsoft Outlook. If you configure your subscription to check for updates automatically, new events will also be shown to you automatically.
To use the link on an Apple iPhone/iPad, you have to copy the link into the Server field under Settings > Passwords & Accounts > Add Account > Other > Add Subscribed Calendar.
To use the link in Google Calendar on an Android system, you have to copy the link and then sign in on the Google Calendar website. In the list on the left, under Other calendars, you will find a (+) icon to add another calendar. Go to From URL there and paste the copied address of the myteam calendar. Afterwards, on your smartphone, you still have to select the calendar in the Google Calendar app settings and enable the sync switch so it is displayed to you.